Wednesday, October 30, 2013

Running Records & a Freebie!

Let's talk running records.  Do you do them? Love them? Hate them?  I learned how to do running records in college and thanks to DRA when I began teaching, rarely did a running record for years.  Our previous principal encouraged us to do them during reading groups, but let me be honest and say I couldn't even figure out how to fit that in.  I was DETERMINED to get them done this year.  I know all the benefits of running records.  Most importantly, it helps you to see where your child is and how they are doing on a particular level to determine if you need to move up, down or stay the same.  Having trouble fitting it in? Let me explain how I do it.

This is a simple recording sheet. Everyone's name is listed on the left.  I write the date of their running record, the level, the score and if it was independent, instructional or frustration. Each child has a tab in my notebook.  I store all their running records behind the tab.


Students come to the table.  1 student sits right next to me. While the other students are rereading with the whisper phone, I read with that student.  (I tell them who this is.)


The students know to whisper read until I finish the running record.  I complete the running record and the retell and put it aside.  I don't take my precious Guided Reading time to score it or any of that.  I can do that later.

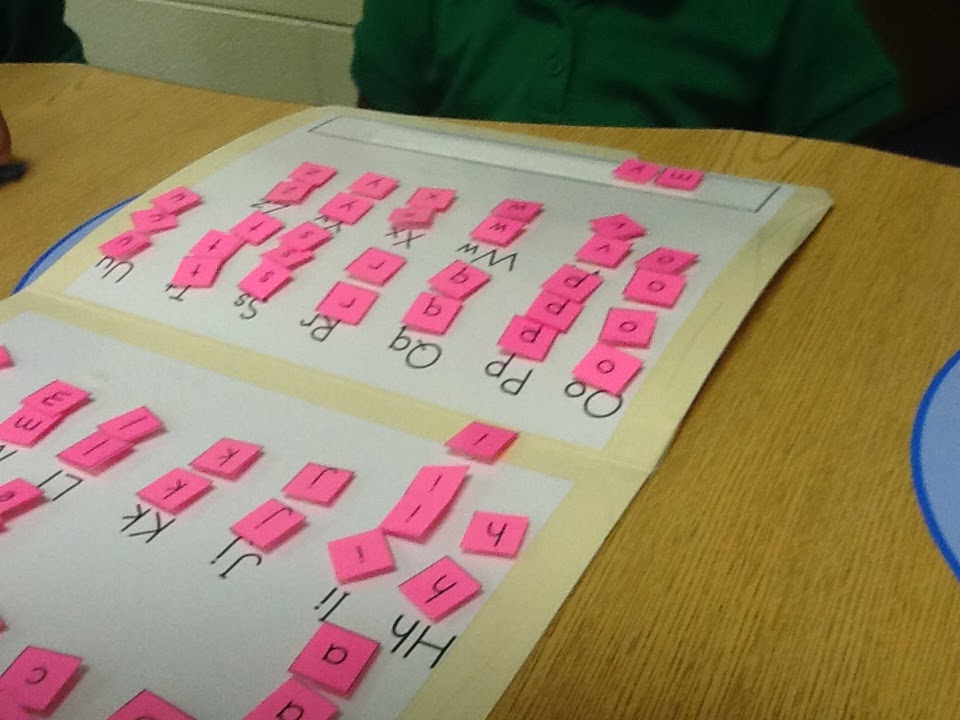
I then check in with my other students to make sure they have an understanding of our book.  Next we make our sight word from the story.  This week I introduced our Making Words Folders.  I got these from What the Teacher Wants.  I color coded mine so if any pieces fall off, I know where they go.  Super time consuming to make, but well worth it.  I have been using paper letters, but it's time for them to start being accountable for finding the letters to make our words.


We write the sight word.  Those dry erase dots are still going strong!


We complete our activity.  We are still working with open ended sentences for guided writing so today their sentence was "I see my big or small ______." They chose a word from the story. We have writing sight words down, we are still working on stretch spelling.  


We played an app at the end to practice some skill work.  This group actually did a rhyming word app!

Later I go back to my Running Record and score it.  Things that are important to me - accuracy, fluency and comprehension.


The friends who read this book today didn't have too much trouble with it.  I showed an example of a perfect one and one with a mistake.   

Questions I asked for Comprehension:

What was the story about?  
Start at the beginning and tell me what happened.
What is the setting of the story?
Did you like the story? Why/Why Not?
How can you relate this story to your life?

These questions come straight from our Read 3D progress monitoring and I want them to be able to answer these questions during that test.  

I write their answers right on the bottom of the running record sheet because I don't need all the lines anyway.

How is it scored?


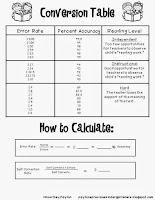
I use this conversion table to get my percentage and these rubrics to figure out fluency and comprehension.  Students need to score 95% or above with a 3 or a 4 on fluency and comprehension to be independent.  We want to figure out their instructional level so we can plan our lessons.  We DO NOT want them to be frustrated! 


I created this simple running record form because after chatting with some coworkers, we decided that if the form had lines it would be easier for us.  I wanted a form that had everything I needed on it.

Are you still with me?  Here's the freebie!  A running record form, conversion chart and rubric just for you! 


Please note: Conversion Chart is based on Marie Clay's conversion chart.  Fluency and Comprehension Rubrics are based on Fountas and Pinnell's Fluency and Comprehension Rubrics.

Here's a question for you - do you do running records? How often? How do you organize them?

Hope everyone has a Happy Halloween! I can't wait to have some fun with my Kinders tomorrow!!

post signature

Monday, October 21, 2013

Centers

You may remember back in the Summer when I posted about how I set up my centers.  When I posted, it was the Summer, so I didn't have any actual center examples to show you.  So today I snapped some pictures of how my centers are set up in case you need some help getting yours started or want a new way to do them.  This is not all the centers I have, but just some of the ones that are open this week.


Art Center - This week they are using tissue paper to cover a pumpkin. The pumpkins are in the tray on the top of the purple bookshelf.  All the materials they need (glue, scissors, pencils etc.) are in that sorter on top of the shelf.  The tissue paper has already been cut for them and is in the basket.  I also made an example so they know exactly what to do.


At every center, you will see the icon for that center as well as a task card.  The task cards are simple, but they are helpful.  Right now, my kids CANNOT read these.  That is ok! If a grown up walks in, I am out, my assistant is out, the world ends - someone will know what they are supposed to do that that center and help them.


This is my ABC Center (There are puzzles on that bookshelf I know, the puzzle center is around that location too.)  The Accountability Sheets and materials are on the shelf, and the game is in the basket.  Again I provide an example but I encourage them to do the work on their own.  This week they are saying the name of the picture and clipping the beginning sound. Clothespins are in that basket too.


Math Center - Sorting Map & Sorting Pieces in the basket, Materials and Accountability Sheets on the Shelf


Pocket Chart Center - I know these don't match right now...the kids will match them when they get there :) 


Listening - Book is there ready for them...Plain paper for them to draw a picture and write a sentence about their favorite part.


Writing Center - Magnetic Letters to make each word, accountability sheets in the tray.


Please forgive this shelf..it was a heinous yellow and I spray painted it...if you move it, the legs fall off.  Bless.  This is Write the Room.  All they need are clip boards and pencils.  Again I have an example just in case they want to check their work.


This is my center chart.  Some of my icons aren't up there very securely at the moment, but it serves it's purpose.  For more information on how I set this up, check that post from the Summer.

Most of my centers have their own tables or are something that can be done in the floor.  I am super fortunate to have a lot of room and a lot of tables! :) I like for the students to have a game or activity and then some kind of accountability.  This is what works in our room.  My kids LOVE centers.  If you have any questions, feel free to ask! 

If you need a few centers for next week, swing by and grab these freebies.


  post signature

Saturday, October 19, 2013

Bats & Spiders Week and a Freebie!!

This week was all about Bats & Spiders! The kids were super excited about every activity we did!  They learned a lot of facts this week and I was so happy that they could tell me that a fact was "something true."  We did many activities in my Bats & Spiders Unit! There are a lot of fact books and fun activities included.


We did not do an alphabet hat this week, because we made a Spider hat!! These were a lot of fun! 


Here's how you make them:


Give the students 8 strips of black paper.  I had a wonderful practicum student cut, count and paper clip these earlier this week.  It makes it a lot quicker to pass out.  You also need a strip of black poster board.  Mine were about 2-3 inches..I didn't measure I just cut.  I also gave them a square of white paper to cut out the eyes.


Crinkle the legs in an accordion fashion.  I had a moment of genius on Friday...I kept them all together and crinkled them at one time.  Have you ever tried to teach 5 year olds to crinkle paper?   Talk about a time saver!!!


Add legs, 4 on each side.  I spaced mine out a bit more than this cutie did.  Cut out 2 circles from the white paper for the eyes.


Glue on the eyes.


Staple together and look adorable :) I love these kids!

Have you guys heard about the Facebook Frenzy? This is an awesome "hop" put together to offer free products from TpT sellers.  You start on a Facebook Page and when you "like" the page, you snag the freebie and move on to the next one.  I am participating in the K-1 Frenzy and have a super cute activity to share!


You can snag this freebie until Monday night by going to my Facebook page, liking my page, clicking on the FB Frenzy tab at the top and downloading.  There are 45 stops on the K-1 hop - have fun and enjoy the Halloween goodies!! 

post signature

Sunday, October 13, 2013

Fire Safety Week & L Alphabet Hat

We had another busy and successful week in Kindergarten! This week we learned all about Fire Safety! We started out Monday with a Fire Safety Presentation from the Greenville Fire & Rescue.  They have these Fire Clowns that make the kids go bananas.  Before they leave, they take a black sheet and make it jump around to simulate smoke and have the kids crawl under it.


On Friday, we painted flames, which is one of my favorite art projects.  They turn out super cute.  The kids were SO quiet and focused! We told them to only paint with 1 finger at a time and they did 1 color at a time as Ms. Moore Modeled on the Smart Board.


Baby wipes are necessary when finger painting with more than one color.  We also only put one color out at a time for our impulsive friends.


Modeling using the document camera and Smart Board.  I love Ms. Moore! :) 


In the afternoon we reviewed the letters K and L.  We talked about Kicking King and Lucy Lamp Light and because I loved the Lion Alphabet hat so much, we did that one. :)  Stop by Simply Kinder and grab the Alphabet Hat so you can start having a good time too!


These kids are ridiculously adorable, am I right? :) 

Need some Fire Safety Activities? These are the ones we used :) 


Next week we are on to Bats & Spiders and the letters M and N! :) What do you have going on this week?


post signature
Related Posts Plugin for WordPress, Blogger...